Wednesday, December 19, 2012

Improve Your Painting - plotting the lights and darks


One of the early lecture lessons in Lorser Feitelson's painting class at the Art Center School was analysing how the masters plotted out the lights and darks in their paintings.
Who better to look at than Caravaggio.  Here is breakdown of   'The Crucifix of St. Peter."


Desaturated to reveal the grey scale

Reduced to three values
 - light - middle - dark

 You can rotate your value study 180 or 90 degrees and flip back and forth to isolate your view to lose the subject matter and concentrate on value spotting.  Does it work in all directions?  One quick studio method is to hold up a small mirror to your eye and view your composition while in the process of painting or drawing..The errors usually leap right out at you. See other example at Sundblom.

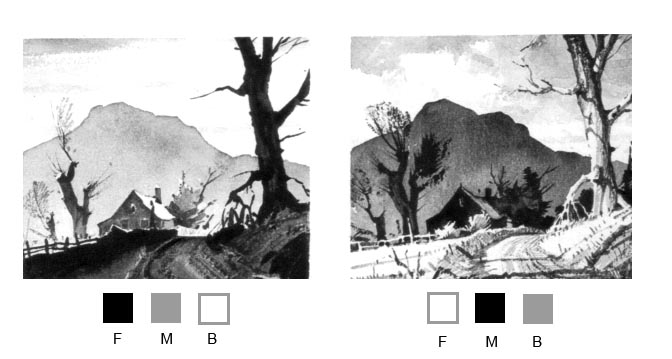
Let's use the three major values dark - light - and middle and work with them from now on to put together small thumbnail sketches.

 I have below some cuts from Ted Kautzky's terrific book on watercolor 'Ways with Watercolor' still available.
 I added the value blocks Foreground, Middle, and Background with the appropriate value arrangement to help you design the same pictorial elements you see on site (or photographic reference) and create an interesting painting.

I hope that simplifies the constant struggle to make your work better and better - when in doubt -KISS
"Keep It Simple Stupid"

Tuesday, December 18, 2012

Lorser Feitelson and Harry Carmean at the Art Center 1960-63

Two teachers at the Art Center School during the 60's Lorser Feitelson and Harry Carmean not only had a heavy influence on their students but I believe on each other..

Lorser Feitelson giving a crit

Harry Carmean teaching a drawing class
 

This is a video of Harry demonstrating figure drawing from a master painting

Old school painting practice..copying the masters


Feitelson also advocated copying old masters after studying the composition and brushwork of old masters such as Frans Hals.
Frans Hals. Gypsy Girl. 1628-30. Oil on wood, 58 x 52 cm. Musée du Louvre, Paris.
Malle Babbe, c.1630. Oil on canvas, 75cm by 64cm. Staatliche Museen, Berlin


Below are the studies done in his class at the Art Center School.
(Close but no cigar) 
Valuable lessons in time management and brush technique.
I regret that I did not photograph these exercises with greater care.


Tuesday, December 11, 2012

DIY Adjustable Drawing Table, quick and cheap!

Here is a simple and inexpensive way to get up and running in your studio space with a few simple tools and cheap parts...3/4" PVC pipe, 2 hinges, a few feet of thin chain and some scrap lumber.
The pics are self explanatory.  I'm sure you can do work-a-rounds for the hardware and use what ever works for you..

This drawing table can accommodate larger drawing pads, canvases, your picture reference, whatever and is very adjustable re: work angle.

You can fold this unit up and store it in a tight space and best of all it is cheap to make.

IKEA sells a table top (AMON) in white for under $6 and legs for about $15... You can buy one or two tops if you want a self supported separate table. 


Make sure that you dry fit the PVC first to get it square...I suggest that you leave it dry for while as you may want to change a few things..The legs as shown are about 10" (not including the elbows or rubber tips)
You can vary the dimensions to suit whatever you are able to come up with re: your current workspace table


The tops are apparently made in a mold with wood stiffeners in each corner to screw the legs into...you need to stay in this reinforced areas for your hinge attachment or your screws will pull out.  You can paint the underside of your board and wood base if you find the bare wood unsightly..

Friday, December 7, 2012

The 8 best ways to improve your drawing


There must be a gazillion books and blogs regarding drawing but this series of posts is going to try to pull together and boil down the key approaches towards improving your drawing.
  1. Surround yourself with really good examples of great drawing.   
  2. When you look at your subject ask yourself "what is it the most?"
  3. Establish a vertical line (plumb line) mentally or even visually next to the subject.
  4. Find and fix in your mind the negative space or spaces that exist surrounding your subject.
  5. Understand what you are looking at...Think about the subject in the round or cross-section.
  6. Use your line or mark to express what you see..thick and thin line - straight and curved.
  7. Look for the opposite surface visible from the surface you are beginning to render with your line and consider that your new line will amplify the total form. 
  8. Follow the form surface with the shadow lines or texture.
The following books are highly recommended and cover all of the above in great detail..

The Vilppu Drawing Manual...(Excellent start and Art Center Graduate)
Bridgeman's Complete Guide to Drawing from Life


Loomis pen and ink

Oberhardt

Mucha


Paul Kley - pen and ink

Kollwitz


Mucha